Monday, December 23, 2013

Poinsettia Book Gift Box PYC #11

I can't tell you how excited I am to share this project with you!  It is the perfect combination of gorgeous papers with wonderful SVG files.  Without further ado, here is my poinsettia book gift box...
 Don't you agree?  These papers were meant to be made into this book.  Honestly.  They are the from The Paper Parade and the collection is called Reflections Christmas by Echo park.  The chipboard embellishments are also part of that collection.  All of the SVG files in this project are from different collections from SVG Attic.  The book itself is from the Nevermore collection.  Yes, that is a Halloween set, but inspiration comes from all places, doesn't it?  The beautiful poinsettia is from Winter Wishes and the swirls are part of the card that is in the Mom's English Garden set.
On the poinsettia, I inked around all of the edges of the die cuts with brown chalk ink and slightly bent them in the middle to give the leaves and petals a more realistic look.  For the center I went around the outside of the circles with Platinum stickles and then added glossy accents to them.  I added self adhesive rhinestones to the swirls for a little bit of sparkle.
 To break up the binding, I used some simply red rumpled ribbon, chipboard embellishments and a key that was tied with twine.
 The best part is that the book is a gift box!  This is a view of book opened with a surprise inside!  I hope you have enjoyed this as much as I did making it.

Now head on over to Parade Your Crafts challenge blog and link up your Christmas/Winter projects for a chance to win a gift certificate to The Paper Parade!  Good Luck!

Have a wonderfully crafty day!

Entering here:
Dec 23 Scrappy Moms Stamps
Dec 25 Word Art Wednesday
Dec 25 DL ART Christmas
Dec 26 MFP Inspiration challenge (I was inspired by the colors in #1 and the patterns in #3)
Dec 27 The Squirrel and the Fox
Dec 27 Little Scrap Pieces
Dec 23 Pinspirational Photo Inspired - using red, white, green, cream

Challenge winner at Chalk-Ah-Lot-Cafe

Thursday, December 19, 2013

DVD Gift Box

Happy Thursday everyone!  Today I am sharing how easy it is to dress up a gift of a movie.  This Christmas, my boys are getting the movie "Planes" (Shhhh....don't tell them!).  Of course I could have just wrapped it in wrapping paper and called it good, but why settle for good when you can have great?  LOL!  I used the DVD gift box from the Stocking Stuff collection at SVG Attic.  I cut all the layers at the imported size and used Disney Cars papers for the whole project.
For the front I used the negative die cuts from the inside window but flipped one of them over to get the colors I wanted (my paper was double sided).  To get the blue to shadow the cream, I just cut the blue piece directly down the center and adhered it offset on both sides.  I inked all the edges of the cuts with brown chalk ink to add dimension.
This beautiful bow is from the Make A Wish set.  Doesn't it make the perfect bow for a package?  I also cut this at the imported size and it fit very well on this package.  Actually, this bow is one that you could make at any size and add it to add a very personal touch to your gifts even if they are wrapped with wrapping paper!
Last but not least, a peek at the details I added to the front, sequins, embroidery floss, and a tag.  This tag was from Holly's Holiday Boxes.
This week SVG Attic released a new set called Winter Fun Photo Props.  Wouldn't this be so fun at a Christmas party?!!
To get this set free, add a minimum of $9.98 to your shopping cart, then add this new set to your cart and use the coupon code FREE on step two of the checkout process!  PLUS all of their SVG's are 50% off right now!

I hope you have a wonderfully crafty day!

Entering Here:
Dec 30 My Craft Spot
Dec 22 Eureka Stamps
Dec 22 Simon Says Monday Challenge
Dec 23 Scrappy Mom Stamps
Dec 23 Loves Rubberstamp Chat
Dec 23 TTCRD

Dec 23 Cut It Up
Dec 23 Pinspirational Photo Inspired - using red, white, green, blue and circle shapes

Challenge winner at Trendy Twine!

Thursday, December 12, 2013

Cinnamon Slice Bread and Gift Box

I love to give my neighbors something home-made for Christmas.  I know it is something that is very appreciated and I love making crafty things, so it is a win-win gift :)  This year I knew I wanted to make some kind of a bread to give, but couldn't decide on which one.  So I made the bread holder first using SVG Attic's Holly's Holiday Gift Boxes.  I finally decided to make Cinnamon Slice bread from the Rhodes website.  I will include the recipe below for anyone who is interested in trying it.  The bread gift box fits bread from a large 9"x5" loaf pan perfectly!
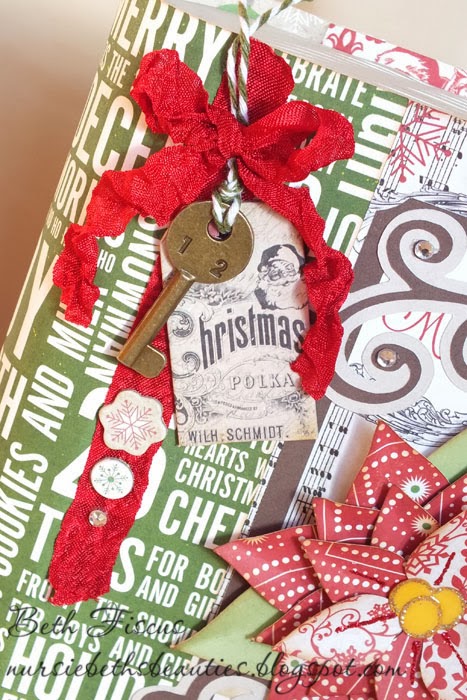
 I then made a tag using the rosette and tag layers from the gift card holder box in Holiday Cheer Gift Boxes.  I added another tag layer to the back of the rosette to write a little note on for my neighbors.  To finish it off, I wrapped the bread with rumpled ribbon, added twine to the tag and it was done!  I also used brown chalk ink to go around all of the corners and edges of the box.
Let me tell you, I made a loaf of this bread for my family as well and oh my goodness...it is HEAVENLY!  I will be making it again very soon, but I'd better make more than one loaf because that was inhaled pretty fast LOL!

Here is the recipe for the bread:

Cinnamon Slice Bread  (originally from the Rhodes website)

1 loaf frozen bread dough, barely thawed
1/3 cup butter, melted
1/2 cup sugar
2 1/2 teaspoons cinnamon

Glaze:
I just mixed milk and powdered sugar to get the consistency of glaze I wanted :)

Instructions:
Slice loaf into 24 thin pieces. Combine the sugar and cinnamon and mix well. Dip each dough piece in the melted butter and then in the cinnamon sugar. Line them up in a sprayed 9x5-inch loaf pan, each piece on it's edge, to make a loaf shape (I staggered mine from side to side so there was enough room in the pan). Cover and let double in size. Remove cover and bake at 350°F 20-25 minutes. Cool in pan 5 minutes and then place on cooling rack. Combine glaze ingredients and drizzle over warm cinnamon slices.

I hope you have a wonderfully crafty day!

Honorable mention at 613 Avenue Create!
Challenge Winner at Die Cuttin Diva's!

Top 3 at My Craft Spot!
Entering here:
Dec 12 Cardz TV

Monday, December 09, 2013

Christmas Doily Card

I am just stopping in quick to show you a Christmas card that I made using some delicious goodies that I received recently.

The collection of paper that I used is Echo Park's Reflections Christmas from The Paper Parade and the chipboard sentiment sticker is from the same collection.  The ribbon at the top is called Ribbon Candy from 3 Girl JAM.  The doily die and the sequins are both from My Craft Spot.  I also used brown chalk around all of the edges of the kraft and patterned cardstock to add to the vintage feel of the card.
And now to share our Christmas tree with you!  My three little boys (ages 6, 3, and 16 months) helped decorate it, so it isn't "perfect" but it is just right for our family.  Plus, the ornaments have been rearranged several times already from my littlest one LOL!  Thank goodness for unbreakable ornaments!
I hope you have a wonderfully crafty day!

Entering Here:
Dec 10 Paper Pretties
Dec 10 Inky Impressions

Dec 11 Word Art Wednesday
Dec 12 3 Girl JAM
Dec 12 Sister Act

Dec 31 Mema's Crafts
Dec 31 Chalk N Stock
Dec 31 Just Be Creative


Also entering in Docerela's Christmas tree linky party!

Thursday, December 05, 2013

Christmas Projects

December is upon us!  If you are like me, you may be scrambling to try to figure out what gifts to but loved ones, how to wrap them, what cards to give out, and the list goes on!  Relax...I am here to recap a few Christmas ideas that I made earlier this year and hopefully you will gain some inspiration from them. All of these projects were made using files from SVG Attic.


To find all the details on these projects, click on the name directly under the picture and that will take you to the specific blog post.  If you would like more Christmas ideas, go to the SVG Attic Christmas  page for more inspiration!  As always, if you make something from SVG Attic files, we would love for you to share it on our Facebook page.

I hope you have a wonderfully crafty day!

Thursday, November 28, 2013

Poinsettia Wreath Card

Good morning!  I am so excited to share this card with all of you today!  As soon as I saw SVG Attic's Winter Wishes SVG kit, I immediately fell in love with it and have been brainstorming ways to use it ever since.  I don't usually hand-make the Christmas cards I send out because I get photo cards of my boys made so everyone can stay updated with them :)  Plus it would take a long time for me to make 60-70 cards.  However, I make exceptions for a few people and this card happens to be going to my husband's grandparents.  His grandma has the most gorgeous poinsettias that she keeps alive year round.  Without further ado, here is the card.
The card base itself is from the All At Sea set at SVG Attic.  It is the perfect shape to compliment the wreath.  It is A2 in size.
The wreath itself is from the Winter Wishes set.  I imported all of the wreath elements and sized them all at the same time so the wreath base was 4" wide.  The banner is one that I just cut by hand.  I stamped the sentiment on a thin strip of cardstock and folded it, then flagged the ends.  I used brown chalk ink around the banner.
Here is a close up of the beautiful poinsettias on the wreath.  Aren't they so realistic?  I used white chalk ink around the edges of all the layers.  I used Christmas Red Stickles on the top layer to add a little sparkle.  They are popped up with foam tape from the wreath base.  I added an adhesive pearl to the center of each to finish them off.
 I decorated the bottom using rumpled ribbon, some hemp twine and a jingle bell.
 And last, but not least, the inside of the card.  I colored the small elements with markers and added a small amount of Platinum Stickles.

I hope I have inspired you today with my card!  If you are in need of these files or any other SVG Attic files, now is the time to get them.  They are only $1 per set right now!  That price is only good through Thanksgiving Day (today), so don't wait!

Challenge Winner at Totally Papercrafts!
I hope you have a wonderfully crafty day!

Entering here:
Nov 28 Totally Papercrafts
Nov 29 Little Scrap Pieces
Nov 29 Chalk N Stock
Nov 30 Creative Inspiration Paint
Nov 30 DL.ART monthly linky
Nov 30 Just B Creative Crazy
Nov 30 Ribbon Carousel

Nov 30 Mema's Crafts
Dec 2 FOSTV #100 (I used MFP Presents stamp set)
Dec 4 4 Crafty Chicks
Dec 4 Crafty Ribbons Challenge
Dec 4 Inspired By Stamping
Dec 6 The Paper Nest Dolls
Dec 9 Paper Issues
Dec 10 Happy Campers

Monday, November 25, 2013

Pie Box for Parade Your Crafts #9

It is time again for the new challenge at Parade Your Crafts.  The theme for PYC#9 is Thanksgiving, which is going to be here soon.  To me, that means family and food!  When Lisa from sent me Echo Park's Reflections: Fall collection of paper I was completely inspired by the saying that you see on the card I made.  "There is always room for pie."  My family has always loved pie.  My mom is the queen of making fruit pies and she currently makes and sells pies every weekend.  It is a lot of work when you make everything from scratch, but there are no pies that you can buy that even remotely compare to hers.  So I made these projects for her!
I made this pie gift box from SVGCuts' Fall Harvest SVG kit.  I used both the 12x12 papers and the 6" paper pad from the Reflections: Fall collection.  It opens up and I added some candy inside.
Here is a close up of the flowers on the top.  These flowers were easy to assemble and the papers were perfect for them.  I used a round 14 Epiphany crafts tool to make the center for the mum.  I used brown chalk around all of the edges to add definition.  The sentiment banner is from the layered stickers.  The bow is made of sunflower rumpled ribbon.
And now on to the card...I used the saying from this paper, added lots of layers of designer paper and used stickers and layered stickers to embellish it.
I used "Olive You" mama's mesh for the bow and some Tim Holtz Distress glitter for the three dots at the bottom and on the pumpkin stem.  I love the subtle touch of glitter it added.

 Here is the inside.  Once again, I used more of the stickers from the Reflections: Fall set.
I hope you enjoyed my projects and don't forget to link up your Thanksgiving projects at Parade Your Crafts!

Selected a showcase pick at Die Cuttin Divas!
Challenge winner at 3 Girl JAM!
Top 3 Winner at Jo's Scrap Shack!
 Have a wonderfully crafty day!

Entering here:

Nov 25 Die Cuttin Divas
Nov 25 Papertake Weekly
Nov 25 Paper Issues
Nov 26 Penny's Paper Crafty Challenge
Nov 26 Crafty Creations Challenge
Nov 26 Word Art Wednesday
Nov 27 Decorate To Celebrate
Nov 28 Totally Papercrafts
Nov 28 3 Girl JAM
Nov 28 Jo's Scrap Shack
Nov 29 Chalk N Stock
Nov 29 2 Sisters
Nov 30 Creative Inspiration Paint
Nov 30 Connie Can Crop
Nov 30 HIMCR #125
Nov 30 DL.ART monthly linky
Nov 30 Just B Creative Crazy
Nov 30 Ribbon Carousel

Dec 6 The Paper Nest Dolls

Thursday, November 14, 2013

Turkey Treat Dispenser

Hello everyone!  Are you making Thanksgiving preparations like I am?  I decided to make a turkey treat dispenser using SVG Attic files that will be a perfect addition to my Thanksgiving table. The box itself is from the Fun Favors collection.  I used paper from DCWV's Playtime stack.  I thought the colors on that paper really had a fall feel to it.
I think that turkey is adorable :)  It is from the Thankful Friends collection.  For the tail feathers I used BoBunny double dot cardstock, and the eyes were stamped with a Peachy Keen stamp.  That green ribbon is from Lovebug Creations.  I used brown chalk around all of the die cuts to add more dimension.  I couldn't help myself and added glossy accents to the turkey's beak waddle and feet.
 On the bottom part of the dispenser I added the "Thankful" caption from the Beautiful stamp set from Paper Sweeties.  Three buttons, a little jute cord and it was ready to go!
As soon as my boys saw this, they fell in love with it...playing with it, gobbling down the M&M's...so if you have young kids, this is sure to be a hit with them at your Thanksgiving table too!

Top 3 at Robyn's Fetish Challenge!
Showcased on the Paper Issues blog!
Challenge winner at Craftin Desert Diva's!
Challenge winner at Decorate to Celebrate!
Chosen among the top 3 at Red Carpet Studio!
I hope you have a wonderfully crafty day!

Entering here:
Nov 14 Scrappy Mom Stamps
Nov 14 3 Girl JAM

Nov 15 Wags N Whiskers
Nov 16 Creative Inspiration Paint
Nov 16 Glitter N Sparkle
Nov 16 HIMCR #123
Nov 16 Robyn's Fetish
Nov 16 Pumpkin Spice
Nov 17 Chalk-ah-lot
Nov 18 Cuttin and Stampin
Nov 19 Party Time Tuesdays
Nov 20 Docerela Creations
Nov 20 Word Art Wednesday
Nov 20 Paper Pretties
Nov 20 Penny's Paper Crafting Challenges
Nov 22 The Paper Nest Dolls
Nov 24 Craftin Desert Diva's
Nov 24 Red Carpet Studio
Nov 25 Paper Issues
Nov 27 Decorate To Celebrate
Nov 29 Chalk N Stock
Nov 30 DL.ART monthly linky
Nov 30 Just B Creative Crazy
Nov 30 Ribbon Carousel

Thursday, November 07, 2013

Autumn Pumpkin and Great News!

Today I wanted to share a autumn pumpkin that I made using the Pick a Pumpkin SVG kit from SVGCuts.  It is such an adorable set and these pumpkins are so pretty.  The patterned paper I used is from DCWV's Amber Autumn stack.
 To embellish the top, I used some Sunflower rumpled ribbon, the autumn stamp is from Punkin Patch stamps and the orange bead on the tag is from Miriam's Crafting Supplies.  The pearl in the center of the flower is actually just a regular pearl that I colored with a brown sharpie marker.
I distressed all the edges of the cuts with brown chalk.  This is part of my fall decor that will stay up until after Thanksgiving.

Now on to my fabulous news...Lisa over at the Parade Your Crafts Challenge Blog has asked me to stay on as part of her designs team on Krewe 2!  I have been a guest designer the past two challenges and have enjoyed it so much!  You still have a few days to get your Halloween/Fall entries in for the current challenge.

I also just have to share SVGCuts' latest kit, Silent Night.  Isn't it breathtaking?  I already had to buy it and have plans to make that church.  When I was growing up I went to a church that looked just like that and it holds such a dear place in my heart.
The Silent Night kit is free with any purchase of $9.98 for a very short time, so now is the time to get it if you love it as much as I do!

I hope you have a wonderfully crafty day!

Top 3 at Cut It Up!
Challenge Winner at LoveBug Creations!

Entering here:
Nov 9 HIMCR #122
Nov 9 The Paper Nest Dolls
Nov 9 Glitter N Sparkle
Nov 9 Robyns Fetish
Nov 9 Pumpkin Spice
Nov 10 Eureka Stamps

Nov 10 The Kraft Journal
Nov 10 Craftin Desert Diva's

Nov 10 Sentimental Sundays
Nov 11 Party Time Tuesday
Nov 11 Cuttin and Stampin
Nov 11 Victorine Stamp Ch#71

Nov 11 Paper Issues
Nov 12 Paper Pretties 

Nov 13 Word Art Wednesday
Nov 12 Pennys Paper Crafty Challenge

Nov 14 3 Girl JAM

Nov 15 Cut It Up
Nov 15 Wags N Whiskers
Nov 16 Creative Inspiration Paint

Nov 17 Chalk-ah-lot
Nov 29 Chalk N Stock
Nov 30 DL.ART monthly linky
Nov 30 Just B Creative Crazy
Nov 30 Ribbon Carousel
Nov 30 Connie Can Crop

Monday, October 28, 2013

Halloween Cards for PYC

This is my second post as the October Grand Marshal for Parade Your Crafts!  It really has been an honor.  The current challenge is "Halloween."  I had a lot of fun creating two cards.  For these cards I used the Raven collection by Glitz Design from The Paper Parade.  It has a fun geometric theme to it.
For the first card I used The Bits and Pieces from the Raven Collection.  The stickers are are from echo park.  I added a 1" epoxy bubble over the 31st sticker.
The front rectangle is popped up with foam tape and the finishing touch was tying the gray and black embroidery floss around it and adding the orange rhinestone.
For my second card, I made a tri-fold card.  The pumpkin is a die cut that is from the ScrappyDew vault.
 This is how it opens up.  I added the white panel on the right side to have a place to write.
 I embellished the front panel with black ribbon along the left side.  I added a star button and a twine bow.  I added three metal stars on the hat and also three metal circles along the right side.  The Trick or Treat sticker is also from Echo Park.
I hope you have a wonderfully crafty day!  Don't forget to link up your Halloween projects at Parade Your Crafts!

Entering Here:
Oct 28 Die Cuttin Divas
Oct 28 Cuttin and Stampin
Oct 28 Victorine Originals
Oct 28 Scrappy Mom Stamps
Oct 29 Pinspirational Challenge #80

Oct 29 Inky Impressions 
Oct 30 Simon Says Wednesday
Oct 31 Just B Creative Crazy
Oct 31 DL.ART

Oct 31 Great Impressions
Oct 31 Cardz TV

Oct 31 Ribbon Carousel
Nov 1 2 Creative Chicks

Nov 2 Glitter N Sparkle
Nov 2 Robyn's Fetish
Nov 3 CI Paints

Nov 3 Tammy's Scrapin Corner
Nov 4 Simon Says Monday
Nov 5 Try it on Tuesday
Nov 6 DL.ART Word Art
Nov 7 Cardz TV
Nov 9 Red Carpet Studio
Nov 10 Craftin Desert Diva's