Next up, I created a small card to go with the pencils using a Happy First Day of School Print & Punch Tag as the focal point. It was layered with a die cut from Pink & Main's Card Cut Essentials Dies set 2 and adhered with foam tape to the base. For the base, I used scraps of patterned paper from Doodlebug Design School Days 6x6" paper pad and wrapped In The Navy Trendy Twine around the center. The only other embellishment I used was a couple Blue Berry Sequins.
Thursday, August 14, 2025
Trendy Bakers Twine~Back To School
Next up, I created a small card to go with the pencils using a Happy First Day of School Print & Punch Tag as the focal point. It was layered with a die cut from Pink & Main's Card Cut Essentials Dies set 2 and adhered with foam tape to the base. For the base, I used scraps of patterned paper from Doodlebug Design School Days 6x6" paper pad and wrapped In The Navy Trendy Twine around the center. The only other embellishment I used was a couple Blue Berry Sequins.
Thursday, June 12, 2025
Trendy Bakers Twine~Birthday Bee Card
Thursday, February 06, 2025
Trendy Bakers Twine~St. Patty's Candy Cube
On to the top of the box! Annie's Paper Boutique has so many amazing tag-its, but since this box is 2x2 square, I wanted something a little smaller so you could still see the candy in the box, so I made my own. This tag was made with paper from the same paper pad and a banner die from the Pink and Main Card Cut Essentials dies set 2. Since there is a sun on the belly band paper, I used the Hello Sunshine sentiment from the Choose Happy Stamp set. It was stamped with SB.com pure white pigment ink and Wow! bright white embossing powder. I used Limeade Trendy Twine to make a double bow for the top of the tag, then finished it off with one more Bewitching Sequin. Isn't this project sweet?! I can't wait to give it away!
Thursday, September 19, 2024
Trendy Bakers Twine~Halloween Card Set
Hello all! Halloween is just around the corner, and I have a set of cards with that theme for the Trendy Twine blog to share with you today.

They also all have different sentiments from the APB Happy Halloween stamp set on them. I love the fun fonts and variety of cute sayings in that set! I used Versafine Onyx Black ink for those.
The stamped Halloween kids are from a retired Victorine Originals stamp set, but you can make anything the focal point of your cards! One great option would be to grab some Halloween Tags from Annie's Paper Boutique. There are so many different styles! Another easy peasy choice to use as your focal point are APB Halloween printables you can print off on your own printer. You can find them HERE and HERE.
Other items used on these cards include ATG, foam tape, SB.com hybrid black ink, Artify alcohol markers, and a Cottage Cutz stitched circle die. Now I have a head start on my cards to send out for Halloween! What have you been making for the upcoming holidays?
Tuesday, June 13, 2023
Thanks Scrap Card
Monday, May 29, 2023
25 Cards
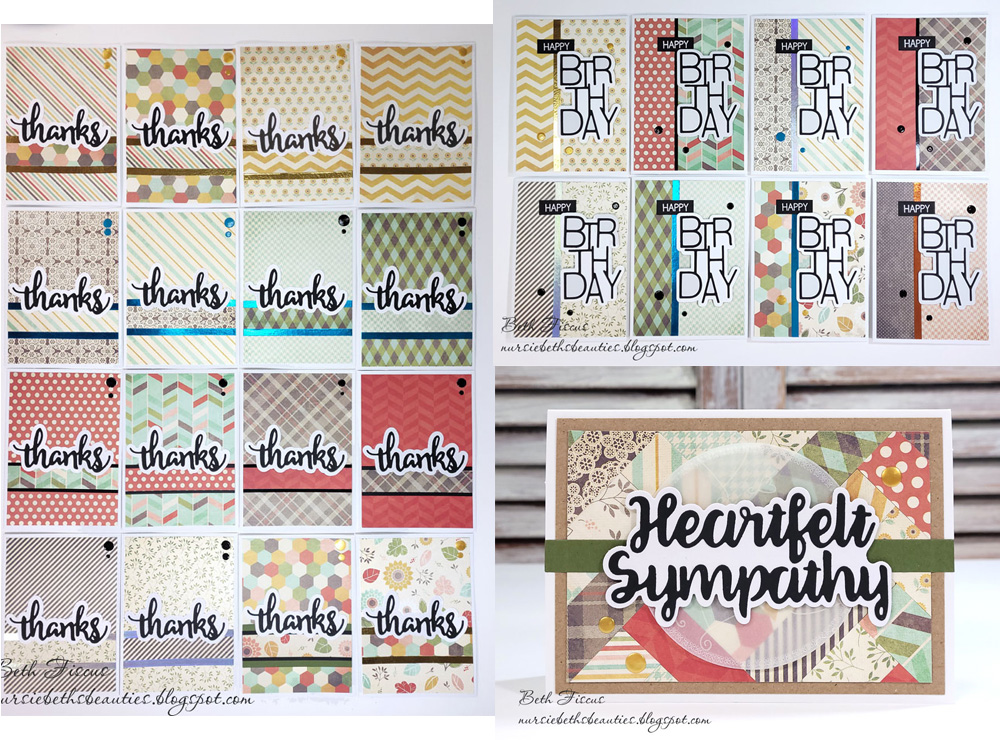
Hello all! Today I am sharing a group of 25 cards that I recently created. I purchased a set of card bases and envelopes a few years ago from Michaels when it was on sale. I didn't realize at the time that the card bases were not actually A2 size, they were only 4" wide by 5.5" tall. So they sat for a long time until I decided to just use them all up at once. This is the result!
There were 16 thanks cards created. I was trying to make great use of a 6x6 pad of Fancy Pants paper called Happy-Go-Lucky as well. As you can see, I cut the paper 3.75" and then cut it 5.25" long. The extra .75'' paper strip went onto a coordinating paper to create the card base. I matched up the papers before I started cutting to make sure they would look nice. I added strips of thin colored tape around the thin strip to keep the layers at a minimum. The thanks die is from Pink and Main. Two dots of pearl pen in the top right corner finished off the cards.Next up, I made 8 birthday cards using scraps from the earlier cards and other scraps I had in the paper pad.
These cards were made with mostly the same elements and embellishments except the sentiment. These utilized Unity Say It Big stamps and dies. The stamped portion was stamped with VersaMark and heat embossed with white powder.
For card #25, I took a piece of white cardstock and added the scrap strips from ALL of the previous cards onto it, then trimmed off the edges. The circle was a patterned vellum and I die cut it with a GMD x stitched circle die. The Heartfelt Sympathy die was also from GMD and was popped up with foam tape. I also embellished this card with pearl pen dots, just like all the other cards.
Thursday, June 09, 2022
Trendy Bakers Twine~Lightning Bugs Card
Tuesday, January 11, 2022
6"x6" One Sheet Wonder Cards
Good morning! I recently decided to try out a One Sheet Wonder diagram of 6- 6"x6" papers to yield 8 cards from Kathryn B.'s blog. I used her Template #2 with papers from Echo Park's Summer Dreams 6x6" pad for this set of bright summery cards.
This was what I created for Cards 1A, 1B, and 1C. Stamps were from Amazon, stamped with VersaFine Onyx Black for "happy", and VersaMark with white embossing powder for "birthday". I placed the paper with "happy" on my Brother Scan N Cut mat, which cut around it, then I shadowed it to create the vellum underlay beneath the word. The black sentiment strip was popped up and the finishing touch was a few sequins.Cards 4A and 4B also have a birthday theme to them. The stamp is retired from My Craft Spot (Chalkboard Sentiments) and was stamped with VersaFine Onyx Black ink and heat embossed with clear powder. I also used a white gel pen to fill in the open places within the letters making the stamp pop a little more. A trio of enamel dots finished off these cards.
This duo is cards 2A and 2B. The image stamp is Pink and Main Sunflowers stamp set. The sentiment is from Paper Sweeties So Sweet Of You set. It was all stamped with Scrapbook.com hybrid black ink and colored with Artify alcohol markers.
The stamped image was die cut with a GMD Up & Down In & Out square die. The focal point was popped up with foam tape and two yellow enamel dots were placed in the top left corner.
The final card was Card 3 on the template. This one was quite simple. The sentiment was from Pink and Main Sunflowers set and was stamped in black. The sunglasses were cut with my Silhouette Cameo and popped up. Enamel dots on the sunglasses and flamingo paper added a bit of visual interest.
Other adhesives used on all cards include Bearly Art precision tip glue and ATG.
What do you think? I really loved the layout of these cards! They definitely don't look like you were trying to scrimp on patterned paper, which is what some OSW templates end up looking like. If you like them, head to Kathryn B.'s blog and try them for yourself!
I hope you have a wonderfully crafty day!